To read the full article by Sandie Parrott on Sean Rosenkrans’ garden railroad, pick up a copy of the April, 2014 issue of Michigan Gardener in stores or find it in our digital edition.
Captions and photos by Sandie Parrott


Click on the cover to read now!
To read the full article by Sandie Parrott on Sean Rosenkrans’ garden railroad, pick up a copy of the April, 2014 issue of Michigan Gardener in stores or find it in our digital edition.
Captions and photos by Sandie Parrott
By Steven Nikkila
Is one of your most important tools ready? Are your hand pruners SHARP?
When pruners are sharp they allow you to work faster and cut cleaner, which is healthier for your plants. After being cut, a plant oozes sap or resin, which dries to create a protective shield. That’s just the start of the healing process. The plant will divert energy from its growth to the damaged area while the wound is healing. You want the plant to heal as quickly as possible. One way to do this is to make sure you create a smooth surface with a clean cut using a sharpened tool. Not only will the plant heal more quickly, but it will be exposed to less damage from diseases, insects, and weather extremes.
The following steps will help you learn the proper way to sharpen hand pruners and keep them in top working condition.
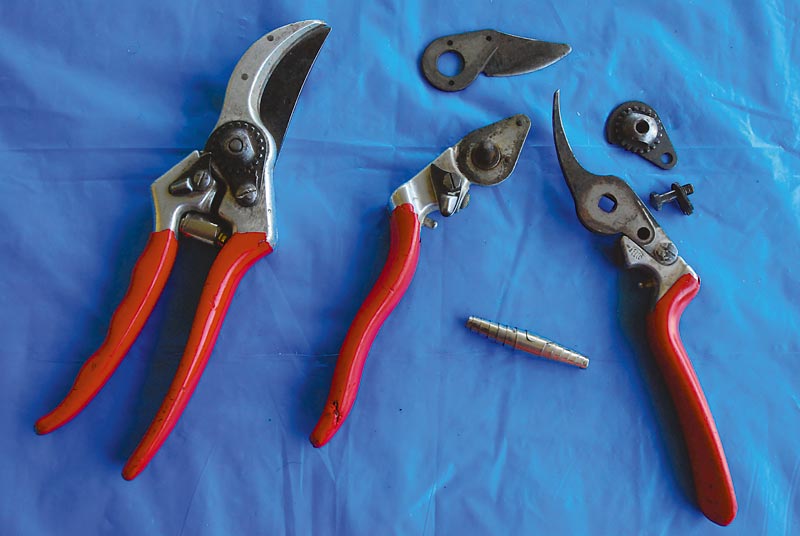
1) Clean the pruners. Using a wire brush, steel wool (sandpaper also works) and elbow grease, remove all of the dirt and rust. Many pruners are easy to disassemble for easier sharpening or blade replacement. Some types of pruners are not as easy to take apart and can be sharpened while still together.
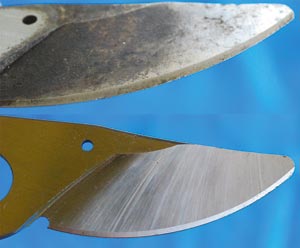
2) Inspect the pruners, especially the blade. Examine the blade for any burrs, nicks or cracks. While doing this, note the beveled edge of the blade—when sharpening, you’ll want to be careful to maintain the same angle as the bevel.
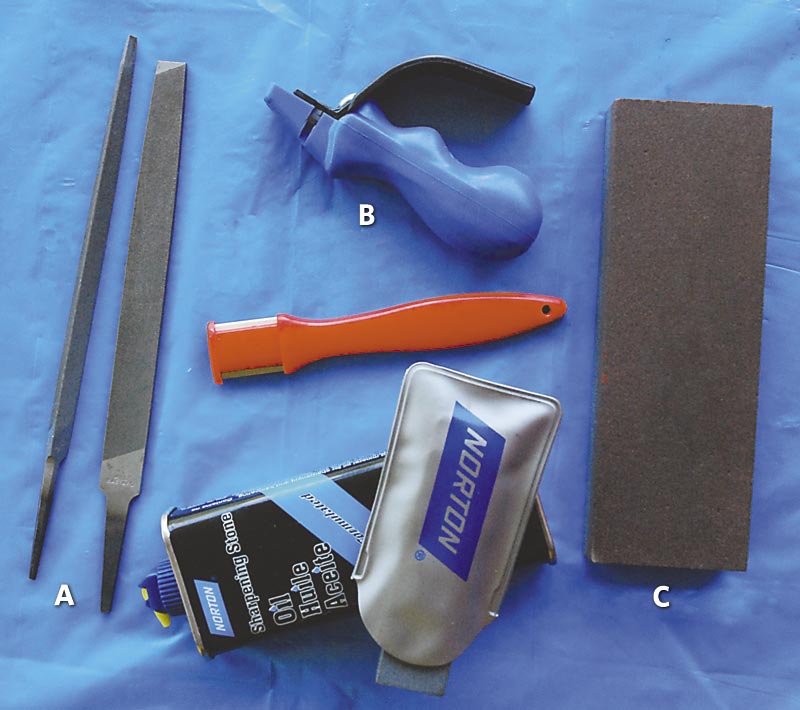
3) Choose a sharpening tool. Which tool is largely a matter of preference: whetstones, the most common choice, offer many gradations and sizes, though you may find that a longer one is easier to work with. A diamond-coated flat file requires only water for lubrication, remains flat for fast sharpening and is durable enough to last a lifetime. A bastard file or sharpening steel is useful for finishing or for a quick fix. A ceramic sharpener is good for quick sharpening during the season or while working. Don’t use power grinding stones; they require extra care because they transfer heat from friction that can affect the metal temper, making it more brittle.

4) Sharpen the blade. Remove any nicks with a file first. Then using your preferred sharpening tool, use numerous (10 to 15) smooth strokes, moving the blade in one direction, from the base toward the tip. Don’t press too hard. You want to achieve a razor-sharp edge, but don’t reduce the beveled edge to less than 1 millimeter thickness. A finer edge will not increase cutting ability but will make the blade more fragile and prone to damage or breakage.
5) Lubricate and reassemble the pruners. Lightly coat the blade with oil (motor or olive) or a protectant/lubricant like WD-40. When reassembling the pruners, make sure the moving parts have some lubrication. White grease works best for the main moving parts, and you don’t need much. A 3-in-1 type oil will also work, but it won’t last as long.
Lastly, go out and enjoy the fall weather and your easy-cutting, newly-sharpened pruners.
Text and photos by Steven Nikkila, who is from Perennial Favorites in Waterford, MI.
A popular topic these days is our record challenging winter here in Michigan. Many of you may have noticed the cracks that have developed on certain trees like sycamores and London planes as a result of the recent frigid temperatures. We recently read about Evanston, IL where the city removed over 60 trees that it felt had become hazardous as a result of cracking. Bob Bricault from the MSU Extension recently wrote on the topic:
Subzero weather is hardly anyone’s favorite time to look for problems in the landscape. Often we do not see damage that happens over winter until spring. Below zero temperatures can create some unique problems for landscape plants. One such problem, frost cracks, can permanently damage trees. Very low temperatures in Michigan this winter have left some trees with vertical cracks. These longitudinal openings referred to as frost cracks can extend deep into the wood of the tree. Certain trees tend to be more prone to this disorder. Most commonly it is seen in sycamores, but it also occurs in maples, apples, cherries, horse chestnuts, lindens, walnuts and willows.